local legs enthusiast
sometimes i do the art thing
About
- jiani/intp/cancer
- i've been drawing for really long time
- i really enjoy character design, esp when it's modern stuff/sci-fi/fashion/fantasy
art faq
Commission Status: closed
Art Tools
Hardware
iPad Pro 10.5in with Apple Pencil 1st Generation:
Pros: Portable, very easy and intuitive to use, can be used for other stuff like uni/school/work, easier for traditional artists to adjust to, smaller gap between traditional art and digital art style, good pen weight (for people who prefer heavy pens)
Cons: very expensive, screen size relatively small, limited amount of apps (the PC equivalents of the apps are usually more powerful), okay-ish for streaming
PC Tablet: Wacom Intuos Creative S (equivalent to the newest, lowest price Wacom tablet - link)
Pros: small, light-weight, affordable (around 80usd), often comes with art software, sturdy (my first one lasted about 5-6 years), use with full versions of CSP, Photoshop or any softwares
Cons: when you draw, you look at the PC screen and not on the tablet; pen needs regular nib changes (esp when you draw with high pen pressure), cannot function without a PC, personally don't like the light pen weight, detachment to traditional art.
Software/App
on iPad and PC: Clip Studio Paint (link)
This is the software I use the most! I always call it the simpler version of Photoshop that is specifically made for artists (whereas photoshop can be used for graphic design, photo editing, etc.). It has tools not just for illustrations but also for comic making and animation! Its biggest advantage is their Asset Portal where you can download brushes and effects, 3d models and many other tools. On iPad you have to pay a monthly or yearly fee, on PC you make an one-time payment! You can have a trial version before you decide on a purchase. Please look out for their discounts, sometimes they lower their PC version prices to -50%!
PC CSP pricing: (link)
iPad CSP pricing: (link)
on iPad: Procreate (link)
Admittedly I haven't used this app a lot, because I was too lazy to figure it out and I was already familiar with CSP interface and tools. But it is an equally good contender for iPad software, coming with a vast variety of brushes, effects, animation and the ability to record your art process! Only downside is that there is no trial period. Price: around 13 USD (one-time payment)
on PC: Paint Tool Sai (link)
This is the software I started out with when I learned digital art. It's reduced to the minimally required functions an art software needs. Therefore also more lightweight than CSP and Photoshop and easier to learn! It has excellent brushes (esp if you like soft brushes) and an intuitive interface. Test out their trial version! It is priced around 50 USD (one time payment).
In-App Settings
A4 (2480x3508px), 300dpi
Flat Marker for sketching, lining, rendering (standard brush in csp)
Transparent Brush + Dense Brush for rendering (standard brushes in csp)
-----
Digital Art Tutorials/Help
(tutorials that are not free are marked with $) (in general, please use references, they are more important than any tutorial you will use)
Beginner (some also for advanced for revisiting foundations)
- "I don't know where to start" (link)
- sycra tutorials for basics: (link)
- genicecream's tutorials: (link)
- kelpls' tutorials: (link)
- proko's channel: (link)
- sycra tutorials for coloring: (link)
- brushes in digital art: (link)
- kim junggi's interviews: (link) (link)
- tool for hand references: (link)
- color theory: (link)
- lighting: (link)
- clothes (link)
- abs (link)
Advanced (some are speedpaint time lapses)
- mohammed agbadi tutorials: (link)
- $ from lines to finished painting: (link)
- rossdraws' illustration+concept art insight videos: (link)
- stylizing eyes: (link)
- $ rossdraws' patreon if you want to learn more about effects:(link)
- atey ghailan explaining splash art process: (link)
- dave greco tutorials: (link)
- 666pigeon's art process: (link)
- list of clip studio paint tutorials: (link)
- coax' channel: (link)
-----
Personal art processes and how I draw stuff
- Timelapse of drawing Ten: (link)
- How I draw hands: (link)
- How I draw hair: (link) (link)
- How I draw water reflection effects: (link)
- How I match the colors of a group of people: (link)
- How I draw stylized faces: (link)
- Recorded sessions of my art stream (expire after 2 weeks): (link)
-----
How to draw stylized faces
First of all I think it's good to have a solid foundation for anatomy! Stylization is basically bending the rules, and you cannot bend the rules if you don't know them well! To me, stylization can be broken down to 4 pillars: shape/angle, distance, omission, exaggeration
Shape/angle: You have to see the facial features as simplified shapes, rather than what they are. An example would be that I draw Ten's eyes in an almond shape and Taeyong's eyes in a rectangular shape. Same goes for hair, rather than drawing every single hair that I see on a photo, I will draw a group of strands as a ribbon shapes. When you look at reference photos, It's important to be able to break down the things you see to simpler structures, because your brain is already trying to process so much information.
Distance: How far are those features apart from each other? A prime example I like to use here is Johnny, who has a long philtrum, which is why the distance between his nose and his upper lip is bigger. Distance and shape/angle will determine the resemblance of the stylized face to the real thing!
Omission: What makes stylized art styles interesting is that you can convey a person's facial feature/information with as little lines as possible. When you are familiar enough with someone's face and anatomy in general, you can pin down their features with a few brush strokes. Depending on your aesthetic preferences, you might omit different things! For example, I prefer to draw noses in a few simple strokes, sometimes when i get the shape right, I will leave out a nostril (or even both!). But that will heavily rely on the factors shape + distance and if you got these down correctly.
Exaggeration: To me, this is the most fun part. This is where I will modify the proportions of the facial features to an aesthetic of my liking, for example make the eyes bigger (because I'm a weeb), face sharper, accentuate eyelashes etc. It is very important to keep the shapes (more than distance) correctly when you are exaggerating (an almond shaped eye stays almond shaped, even when you enlarge it).
I explained here the steps a little: (link)
-----
How to develop an artstyle
I think this is one of the most asked and most overrated topics in my opinion haha! But I do understand the struggle. Firstly, I would say that as a beginner, your priority is definitely NOT style. Stylization is basically breaking the rules of realism, adding elements that are not there or taking away superfluous details. You can only do this efficiently and more or less consistently if you have some good foundations and understanding for anatomy.
I always say that style is the result of your muscle memory/practice + your aesthetics. Sometimes, habits you develop while drawing can become stylistic points (f.e. I rarely draw round shapes and usually simplify them as straight lines and it somehow became the sharp feature my style has); other times it's purely styles and aesthetics you enjoy, like manga (big eyes), classical art (more painterly style) etc.
-----
Artists I admire
- Loika - (link)
- Amei Zhao - (link)
- Tamomoko - (link)
- Lownine - (link)
- Rei - (link)
- Malllllang - (link)
- HDL - (link)
Fic Recs
- slow dance these summer nights, lumark, e: link
- the stars are nothing without you, johnjae, m: link
- it's almost blue, dojae, m: link
- knowing me, knowing you, dotae, m: link
- hunger of the pine, tenkun, e: link
- pop fly, johnjae, e: link
- drink me in, johnjae, e: link
- dreaming (are you thinking what i'm thinking?), tenkun, m: link
- scrambled guts, johnjae, m: link
- even paradise has an expiration date, dojae, m: link
- we all have a hunger, taeten, m: link
- cruel angels, taeten, m: link
- definitely maybe, yutae, m: link
- loopholes, dotae, m: link
- outside the gridlines, johnjae, g: link
- sunchoke, tenkun, e: link
- feels like magic, tenkun, g: link
- miles above, tenkun, e: link
- office hours, tenkun, e: link
- in every known universe, jaemjen, t: link
- i come apart at the seams (so you can stitch me back together again), tenkun, e: link
- last night (i had a dream of this spot), dotae, m: link
- i called you with my heart, dotae: link
- look at me: unfurling, dotae, e: link
- what's a kiss between bros?, lumark, e: link
- i can put on a show, johnjae, e: link
- company (just need some), mark/shownu/wonho, e: link
- recipes for your werewolf boyfriend, tenkun: link
- sibilance, tenkun, t: link
- 2054, tenkun, m: link
- all the strings attached, johnjae, e: link
- i long for you (just a touch), dotae, g: link
- the ones you least suspect, johndo, e: link
- if nothing happens, tenkun, e: link
- exit strategy, tenkun, t: link
- all my demons greet me, johndomark, e: link
- young love, money talks, johnjae, e: link
- in and out with the tide, johnjae, e: link
Which platforms do you use for selling artworks/merch?
REDBUBBLE - company produces and ships for you, you only send in your designs. downside: low revenue
BIGCARTEL - online shop platform with customizable shop front. free version offers up to 5 products in your store; upgrade for a fee for more products. intuitive interface, easy to use. need paypal business account.
DIY google forms + paypal invoice - let customers fill out google forms on which products they want to buy, then send them paypal invoice.
Where do you produce your prints/merch?
STICKERS, KEYCHAINS - ZapCreatives, based in UK, very good customer service, very eco-friendly shipping and packaging. quality of goodies is very good
PRINTS - Mixam, based in UK
COMMISSION STATUS: CLOSED
Commission types:
All commissions will be drawn in a flat style/cel-shading (example 1, example 2) unless you add "full rendering" to your commission!
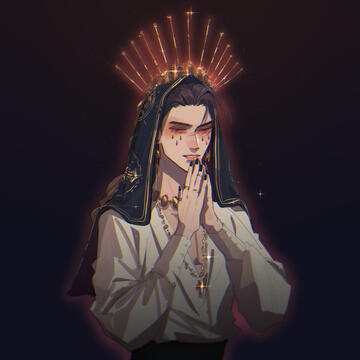
HALF BODY - Image cuts off at the character's waist
30€ / 36 USD
Additional character: 15 € / 18 USD
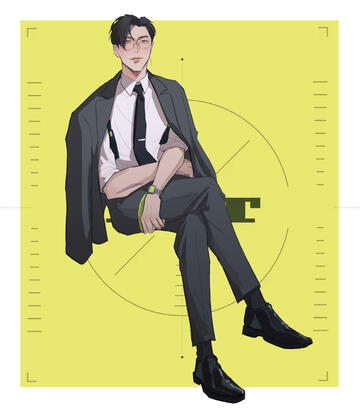
FULL BODY - Character from head to toe
50€ / 60 USD
Additional character: 30€ / 36 USD
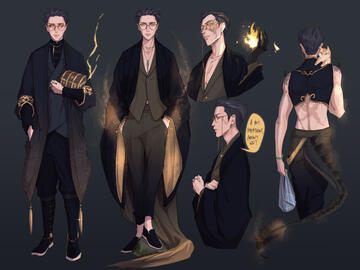
CHARACTER SHEET - Character full body design, 1 full body in other pose OR 2 half bodies in other angles
additional angles/equipment/weapons possible
starting at 75€ / 90USD
ADDITIONS (optional):
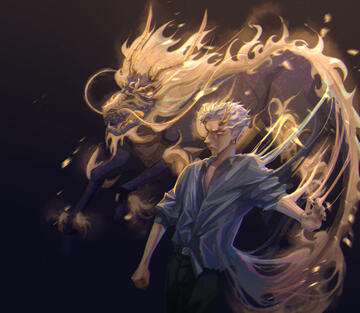
ADDITION: FULL RENDERING - "fully painted" (another example)
+ 48€ / 50 USD
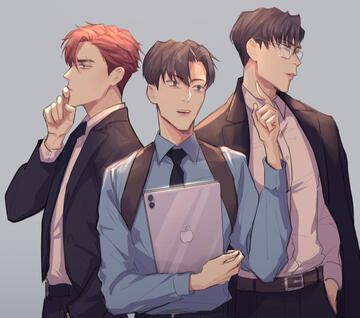
ADDITION: EXTRA CHARACTERS
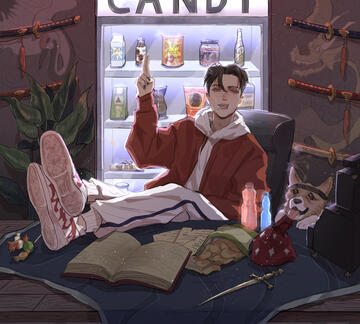
ADDITION: BACKGROUND
depending on complexity
starting at + 20€ / 25 USD
if you're interested in commissioning me, please read carefully through this form and the terms of service and fill it out! thank you!
FORM LINK